Apollo command and service module
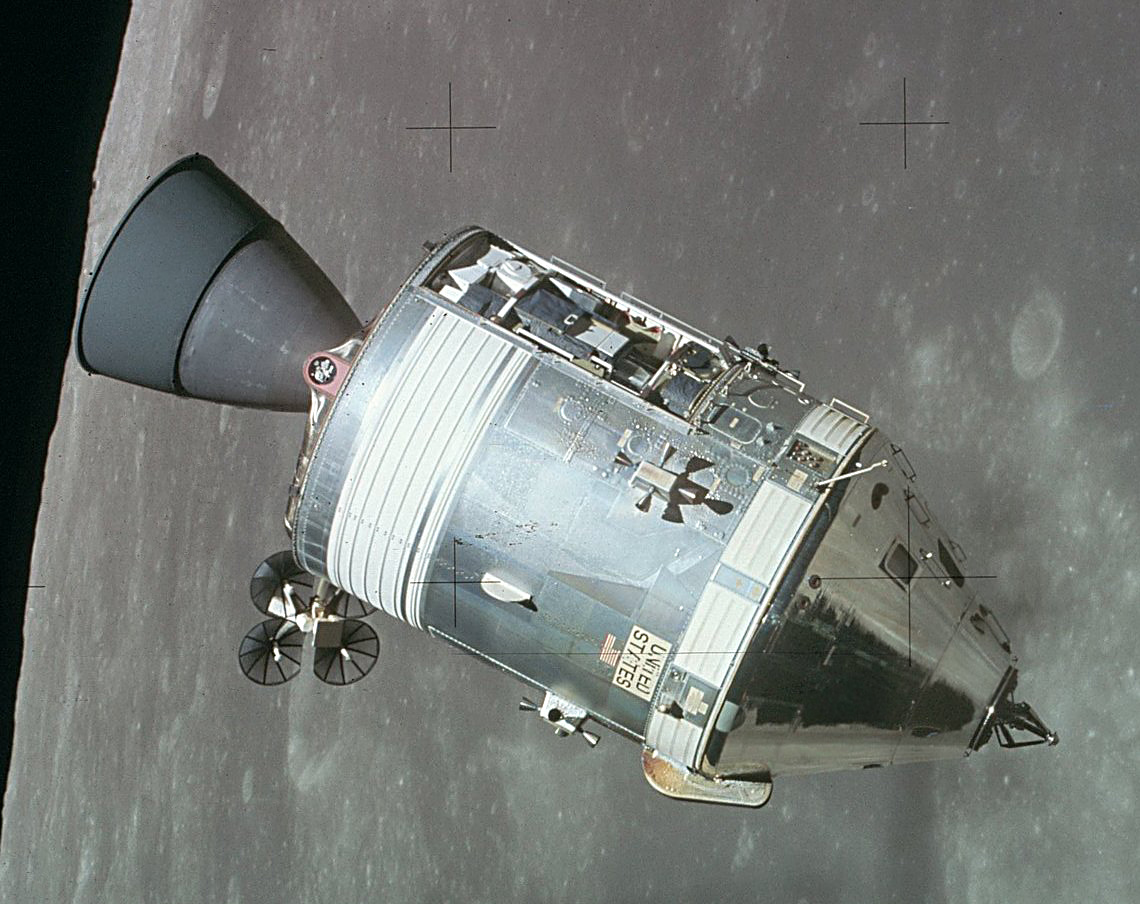
The Apollo command and service module (CSM) was one of two principal components of the United States Apollo spacecraft, used for the Apollo program, which landed astronauts on the Moon between 1969 and 1972. The CSM functioned as a mother ship, which carried a crew of three astronauts and the second Apollo spacecraft, the Apollo Lunar Module, to lunar orbit, and brought the astronauts back to Earth. It consisted of two parts: the conical command module, a cabin that housed the crew and carried equipment needed for atmospheric reentry and splashdown; and the cylindrical service module which provided propulsion, electrical power and storage for various consumables required during a mission. An umbilical connection transferred power and consumables between the two modules. Just before reentry of the command module on the return home, the umbilical connection was severed and the service module was cast off and allowed to burn up in the atmosphere.
Manufacturer
United States
Crewed cislunar flight and lunar orbit
Skylab crew shuttle
Apollo–Soyuz Test Project
Capsule
32,390 lb (14,690 kg) Earth orbit
63,500 lb (28,800 kg) Lunar
26,300 lb (11,900 kg)
2,320 lb (1,050 kg)
3
218 cu ft (6.2 m3)
Three 1.4 kW 30V DC fuel cells
Three 40 ampere-hour silver-oxide
14 days
36.2 ft (11.0 m)
12.8 ft (3.9 m)
Retired
35
19
19
2
1
February 26, 1966 (AS-201)
July 15, 1975 (Apollo–Soyuz)
July 24, 1975
1 AJ10-137
91.19 kN (20,500 lbf)
314.5 seconds (3.084 km/s)
750 s
The CSM was developed and built for NASA by North American Aviation starting in November 1961. It was initially designed to land on the Moon atop a landing rocket stage and return all three astronauts on a direct-ascent mission, which would not use a separate lunar module, and thus had no provisions for docking with another spacecraft. This, plus other required design changes, led to the decision to design two versions of the CSM: Block I was to be used for uncrewed missions and a single crewed Earth orbit flight (Apollo 1), while the more advanced Block II was designed for use with the lunar module. The Apollo 1 flight was cancelled after a cabin fire killed the crew and destroyed their command module during a launch rehearsal test. Corrections of the problems which caused the fire were applied to the Block II spacecraft, which was used for all crewed spaceflights.
Nineteen CSMs were launched into space. Of these, nine flew humans to the Moon between 1968 and 1972, and another two performed crewed test flights in low Earth orbit, all as part of the Apollo program. Before these, another four CSMs had flown as uncrewed Apollo tests, of which two were suborbital flights and another two were orbital flights. Following the conclusion of the Apollo program and during 1973–1974, three CSMs ferried astronauts to the orbital Skylab space station. Finally in 1975, the last flown CSM docked with the Soviet craft Soyuz 19 as part of the international Apollo–Soyuz Test Project.
Before Apollo[edit]
Concepts of an advanced crewed spacecraft started before the Moon landing goal was announced. The three-person vehicle was to be mainly for orbital use around Earth. It would include a large pressurized auxiliary orbital module where the crew would live and work for weeks at a time. They would perform space station-type activities in the module, while later versions would use the module to carry cargo to space stations. The spacecraft was to service the Project Olympus (LORL), a foldable rotating space station launched on a single Saturn V. Later versions would be used on circumlunar flights, and would be the basis for a direct ascent lunar spacecraft as well as used on interplanetary missions. In late 1960, NASA called on U.S. industry to propose designs for the vehicle. On May 25, 1961 President John F. Kennedy announced the Moon landing goal before 1970, which immediately rendered NASA's Olympus Station plans obsolete.[2][3]
When NASA awarded the initial Apollo contract to North American Aviation on November 28, 1961, it was still assumed the lunar landing would be achieved by direct ascent rather than by lunar orbit rendezvous.[4] Therefore, design proceeded without a means of docking the command module to a lunar excursion module (LEM). But the change to lunar orbit rendezvous, plus several technical obstacles encountered in some subsystems (such as environmental control), soon made it clear that substantial redesign would be required. In 1963, NASA decided the most efficient way to keep the program on track was to proceed with the development in two versions:[5]
By January 1964, North American started presenting Block II design details to NASA.[6]
Block I spacecraft were used for all uncrewed Saturn 1B and Saturn V test flights. Initially two crewed flights were planned, but this was reduced to one in late 1966. This mission, designated AS-204 but named Apollo 1 by its flight crew, was planned for launch on February 21, 1967. During a dress rehearsal for the launch on January 27, all three astronauts (Gus Grissom, Ed White and Roger Chaffee) were killed in a cabin fire, which revealed serious design, construction and maintenance shortcomings in Block I, many of which had been carried over into Block II command modules being built at the time.
After a thorough investigation by the Apollo 204 Review Board, it was decided to terminate the crewed Block I phase and redefine Block II to incorporate the review board's recommendations. Block II incorporated a revised CM heat shield design, which was tested on the uncrewed Apollo 4 and Apollo 6 flights, so the first all-up Block II spacecraft flew on the first crewed mission, Apollo 7.
The two blocks were essentially similar in overall dimensions, but several design improvements resulted in weight reduction in Block II. Also, the Block I service module propellant tanks were slightly larger than in Block II. The Apollo 1 spacecraft weighed approximately 45,000 pounds (20,000 kg), while the Block II Apollo 7 weighed 36,400 lb (16,500 kg). (These two Earth orbital craft were lighter than the craft which later went to the Moon, as they carried propellant in only one set of tanks, and did not carry the high-gain S-band antenna.) In the specifications given below, unless otherwise noted, all weights given are for the Block II spacecraft.
The total cost of the CSM for development and the units produced was $36.9 billion in 2016 dollars, adjusted from a nominal total of $3.7 billion[7] using the NASA New Start Inflation Indices.[8]